

Common Transfer Tape Problems When Applying Cut Vinyl



Transfer tape, also known as application tape, keeps cut vinyl letters and separate graphic elements in position while they are moved from the vinyl release liner to the application surface.
When a transfer fails, the tape is often blamed first. In practice, the result depends on the complete material and processing system:
- Transfer film construction
- Adhesive tack
- Vinyl surface
- Vinyl release liner
- Cutting and weeding quality
- Lamination pressure
- Application surface
- Removal method
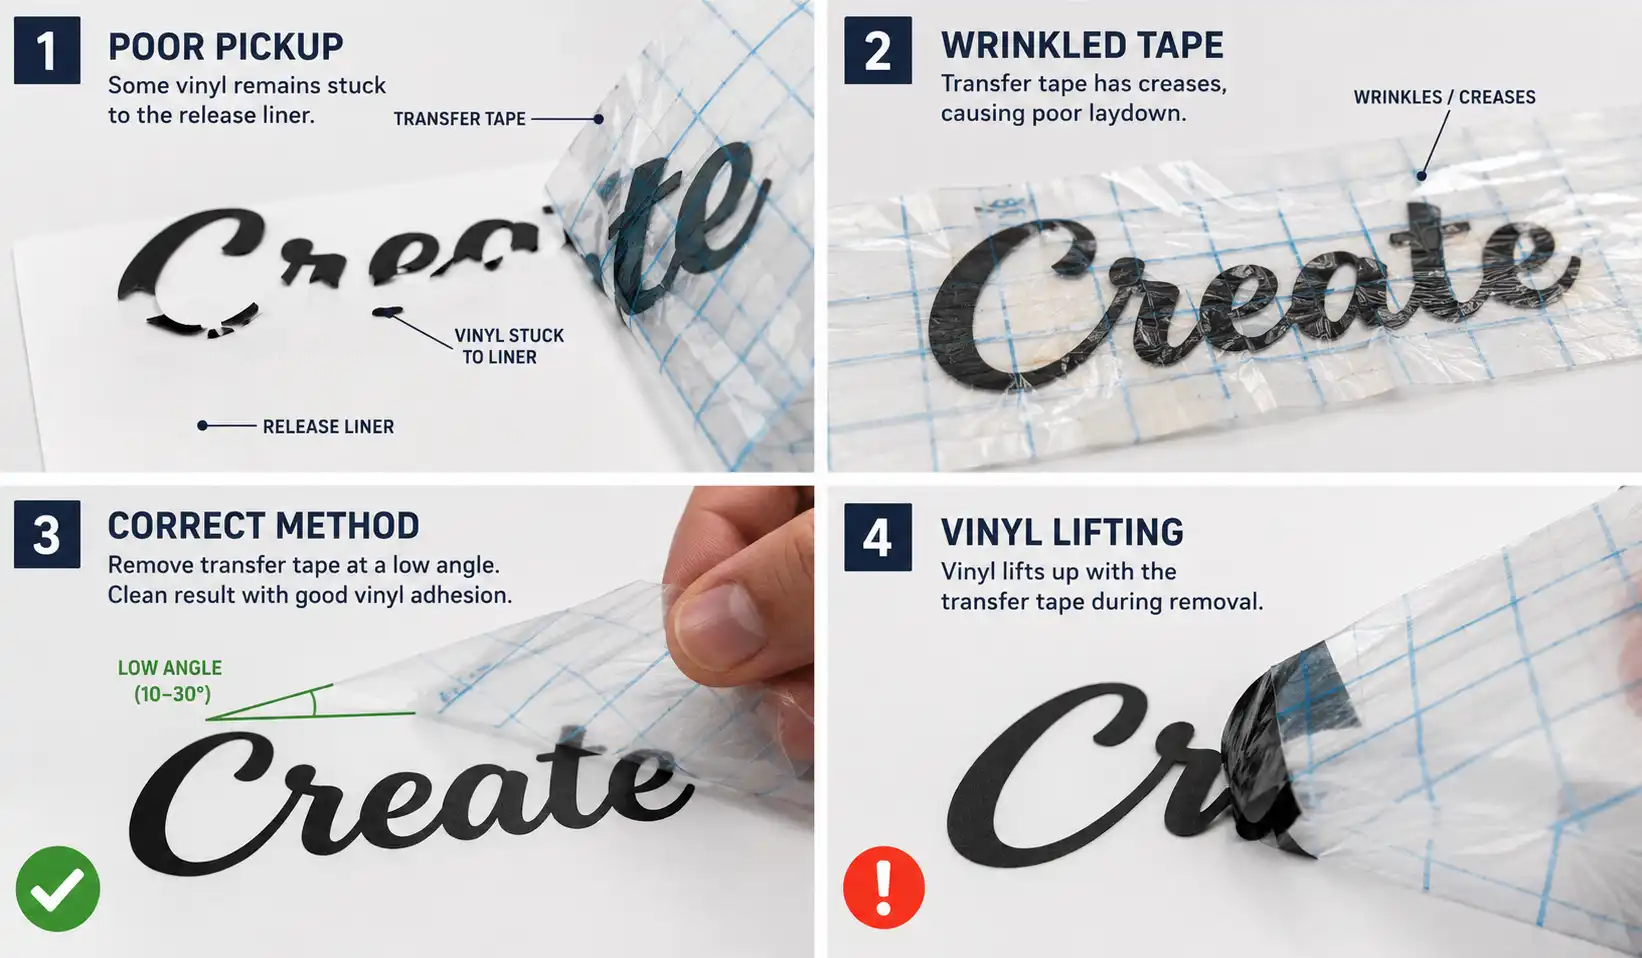
The most useful clue is the stage where the problem first appears. Vinyl that remains on its liner requires a different investigation from wrinkles during lamination or vinyl lifting during final transfer tape removal.
A Four-Step Troubleshooting Method
Before changing the transfer tape, use a controlled troubleshooting process.
1. Identify the Failure Stage
Record exactly when the problem begins.
For example:
- Vinyl remains on the release liner
- Transfer tape wrinkles during lamination
- Letters move during positioning
- The tape is difficult to remove
- Vinyl lifts during removal
- The film does not lie flat before use
This immediately narrows the possible causes.
2. Keep the Main Materials Consistent
Keep the vinyl, vinyl release liner, graphic design, cutting settings and application surface unchanged during comparison testing.
This provides a reliable baseline.
3. Change One Factor at a Time
Change only one variable, such as:
- Adhesive tack
- Squeegee pressure
- Peel angle
- Transfer film construction
- Cutting depth
- Surface preparation
Changing several factors in one test makes the result difficult to interpret.
4. Record the Result
For repeated production, record the vinyl type, transfer tape model, graphic size, application temperature, pickup performance and removal result.
A simple test record can reduce repeated trial and error on future orders.
Transfer Tape Problems at a Glance
| Problem | What to Check First |
|---|---|
| Vinyl remains on the release liner | Cutting, transfer tape contact, pressure, peel angle and tack |
| Small letters fail to transfer | Letter-edge contact, cutting quality and film movement |
| Transfer tape is difficult to remove | Peel angle, application pressure and tape tack |
| Vinyl lifts with the transfer tape | Surface condition, vinyl adhesive and initial bonding |
| Wrinkles or air pockets form | Film tension, alignment and squeegee pressure |
| Graphic elements move | Film stretching and liner removal speed |
| Transfer tape does not lie flat | Storage, winding tension and roll construction |
Check Order for Vinyl Pickup Problems
Cutting and weeding → transfer tape contact with the vinyl → squeegee pressure → peel angle → liner release force → transfer tape tack
Check Order for Removal Problems
Surface condition → application pressure → temperature and bonding time, where recommended → peel angle → transfer tape tack
Problem 1: The Vinyl Does Not Lift from the Release Liner
This is one of the most common transfer tape problems.
The transfer tape appears to contact the graphic, but some letters or design elements remain on the vinyl release liner when it is peeled away.
Start by checking whether the adhesive has made full and even contact with the vinyl.
Material-Related Factors
The result may be affected by:
- A matte or textured vinyl surface
- High liner release force
- Transfer tape tack that is too low for the application
A tape that lifts smooth gloss vinyl successfully may behave differently on matte or textured material.
Process-Related Factors
Also check for:
- Overcutting that damaged the liner
- Incomplete cutting
- Dust or processing residue
- Uneven squeegee pressure
- An unsuitable peel angle
Practical Fix
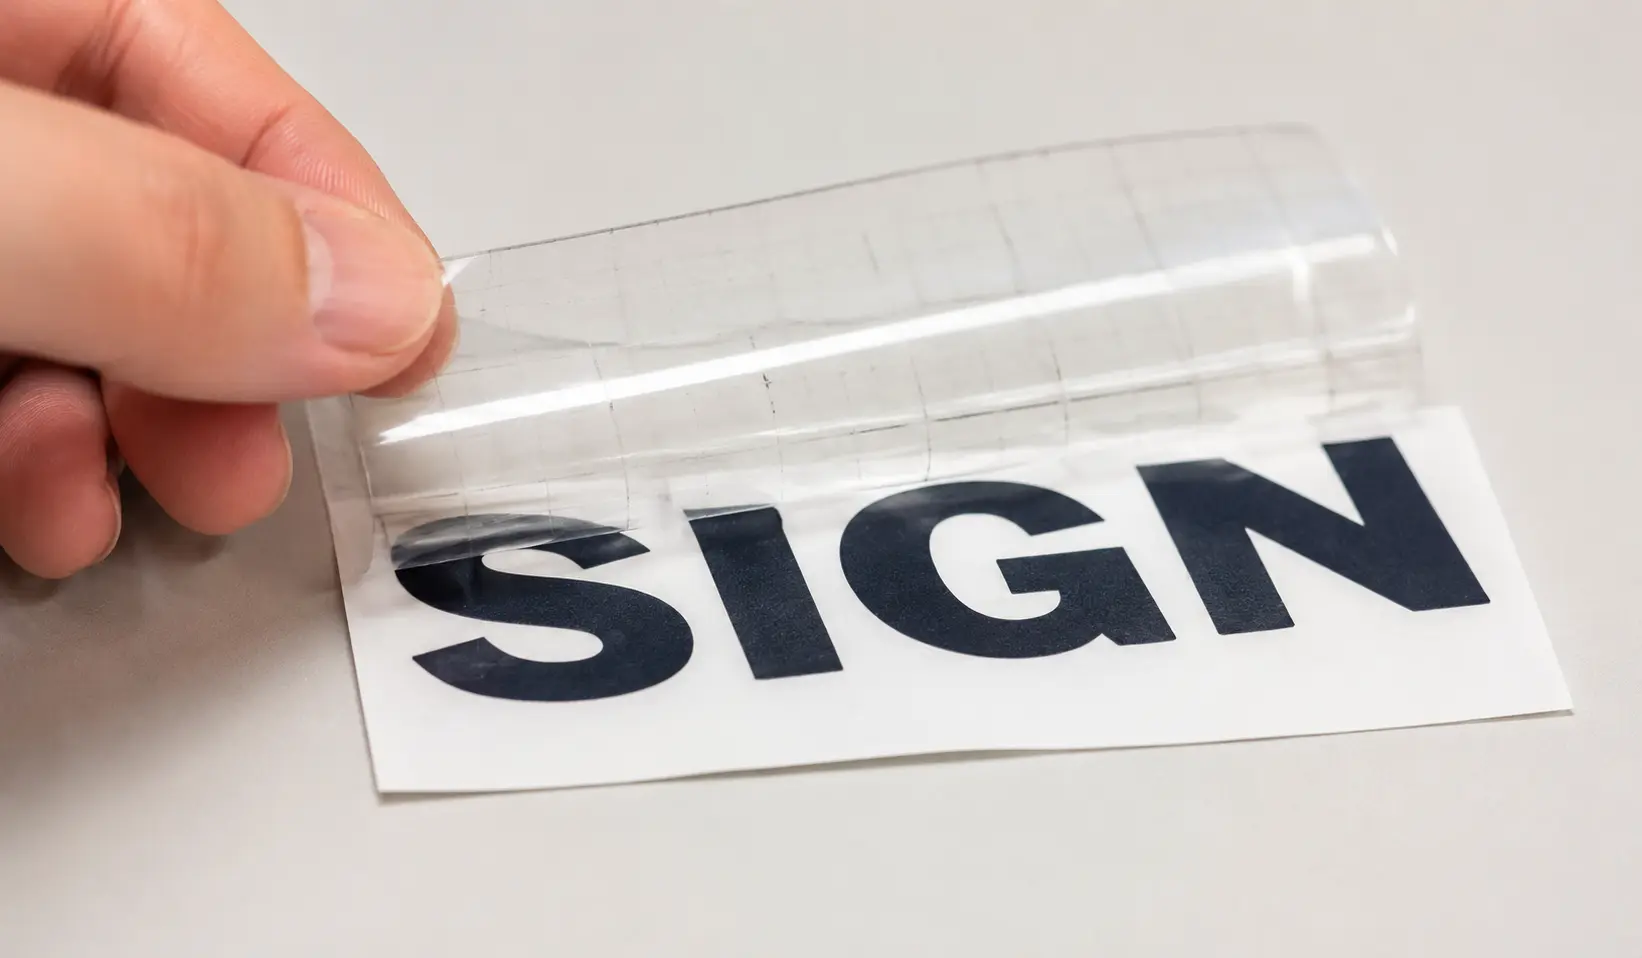
Turn the graphic over so the vinyl release liner faces upward.
Peel the liner back slowly at a low angle, keeping it close to the graphic. If a letter remains on the liner, stop and lower the liner again.
Press the affected area with a firm squeegee, then continue peeling more slowly.
If pickup still fails, evaluate a different tack level while keeping the vinyl, liner and cutting conditions unchanged.
For the complete installation process, see our How to Apply Transfer Tape to Cut Vinyl guide.
Special Case: Small Letters and Thin Lines
Small letters provide less contact area for the transfer tape adhesive. They are also more sensitive to uneven pressure, cutting defects and film movement.
Press every letter edge before removing the vinyl release liner. Keep the liner close to the graphic and peel slowly.
Small letters need sufficient pickup force, not simply the highest tack available. Excessive tack may solve the pickup problem but make final transfer tape removal more difficult.
Problem 2: Difficult Transfer Tape Removal or Vinyl Lifting
Two related results can occur during removal:
- The transfer tape is difficult to peel, but the vinyl remains in place.
- The vinyl lifts from the application surface together with the tape.
Both involve the balance between the transfer tape adhesive and the bond created by the vinyl adhesive.
The Transfer Tape Is Difficult to Peel
Begin with the peel angle.
Remove the transfer tape slowly at a low angle, keeping it close to the application surface. Pulling vertically creates more upward force.
Next, check:
- Application pressure
- Contact around small letters and edges
- Bonding time, where recommended by the vinyl supplier
- Transfer tape tack
An overly aggressive transfer tape holds the vinyl too strongly, increasing the force required during final removal.
A tape that lifts the graphic reliably is not automatically the best choice for controlled removal.
The Vinyl Lifts with the Transfer Tape
When the vinyl rises from the application surface, review:
- Surface condition
- Vinyl adhesive compatibility
- Application pressure
- Temperature and bonding time, where recommended
- Transfer tape tack and peel angle
Some plastics and coated materials are difficult to bond to. In these cases, changing the transfer tape alone may not solve the problem.
If the vinyl begins to lift, lower the transfer tape, press the graphic again and continue more slowly at a lower angle.
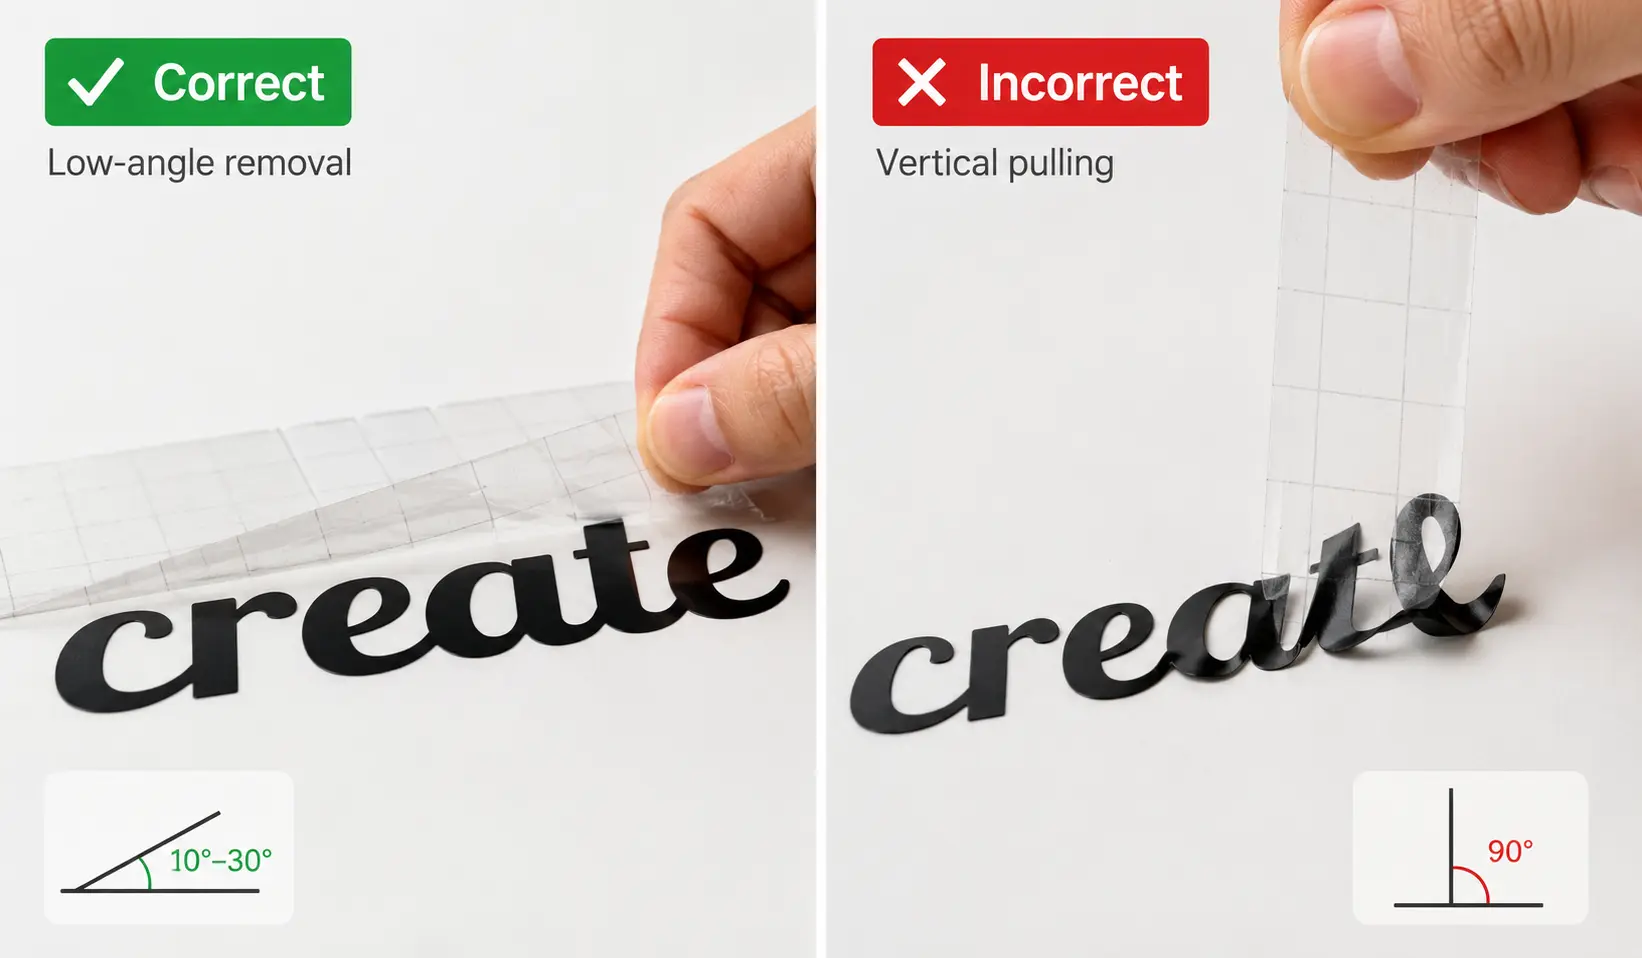
Follow the vinyl supplier’s instructions on additional pressure or bonding time where applicable.
Problem 3: Wrinkles and Air Pockets During Transfer Tape Lamination
Wrinkles and trapped air usually begin while the transfer tape is being laminated to the weeded vinyl.
Wrinkles are commonly linked to uneven film tension, poor alignment, film stretching, rapid application or inconsistent squeegee pressure. They may also form when the adhesive film folds onto itself or when a large area is covered in one movement.
Once a wrinkle crosses small letters or fine graphics, it can create incomplete contact and make later positioning more difficult.
Air pockets usually appear when the film is lowered too quickly, the squeegee strokes do not overlap or the vinyl is not lying on a flat work surface.
A few small air pockets do not always prevent successful transfer. Larger bubbles may reduce contact around detailed vinyl elements.
Practical Fix
Place the graphic on a clean, flat work surface.
Align the transfer tape before its adhesive contacts the vinyl. Lower the film gradually from one edge or from a temporarily secured side.
Use controlled, overlapping squeegee strokes. Do not pull the film under tension.
For larger graphics, laminate the tape in sections rather than covering the entire design in one movement.
For machine lamination, review:
- Roll alignment
- Film or web tension
- Core size
- Winding direction
- Roll flatness
- Equipment setup
Problem 4: The Graphic Becomes Distorted or Misaligned
The vinyl may lift successfully, but the spacing between letters or separate elements changes during handling.
This is most visible in:
- Long lines of text
- Closely spaced letters
- Multi-part logos
- Thin outlines
- Large graphics with separate components
The transfer film may stretch during lamination, vinyl release liner removal, positioning or final installation.
The design may also shift when the liner is removed too quickly or the transfer film is not kept flat.
Practical Fix
Avoid pulling the film under tension.
Keep the vinyl release liner close to the design during removal. Work slowly around detailed areas and confirm that each element remains supported.
For large graphics, keep the liner attached during initial positioning and apply the design in controlled sections.
If distortion continues, review film dimensional stability and adhesive tack separately.
For a detailed material comparison, see our PVC vs PET Transfer Tape guide.
Other Issue: The Transfer Tape Curls or Does Not Lie Flat
This problem usually begins before installation. It may relate to storage conditions, winding tension, film construction or the transfer tape’s release liner, where applicable.
High storage temperatures, extended storage after the transfer tape has been laminated to the vinyl, or excessive tension during unwinding may affect flatness. Roll width, core size and overall roll construction can also influence handling.
Storage position should also be reviewed. Check whether the roll was stored upright or horizontally and whether it was exposed to pressure, impact or deformation. These factors should be considered together with the roll specification and storage history before a cause is confirmed.
Record:
- Storage conditions and storage period
- Storage position
- Whether the roll was exposed to pressure or deformation
- Roll width and core size
- Winding direction
- Release liner type and construction for linered transfer tape
- Whether curling begins before or after lamination to the vinyl
For wide rolls or machine processing, review the complete roll construction rather than adhesive tack alone.
Common Mistakes to Avoid
- Do not increase tack without testing removal performance.
- Do not stretch the transfer film.
- Do not pull the vinyl release liner or transfer tape vertically.
- Do not apply vinyl to a dirty or wet surface.
- Do not remove the full liner before positioning a large graphic.
- Do not judge transfer performance by film thickness alone.
How Film Type Affects Transfer Performance
Film thickness affects handling and dimensional stability. It does not determine adhesive tack.
Once the application and processing requirements are clear, compare adhesive tack and film thickness together according to the required pickup, removal and handling performance.
PET transfer tape is often evaluated for detailed graphics where stable film handling is important. PVC transfer tape may suit buyers who prefer a thicker handling feel.
Selected YG Group PET transfer tape models use 38 μm or 50 μm PET film. Some PVC transfer tape models use a 70 μm clear PVC film.
Film material and thickness cannot correct poor cutting, contamination, unsuitable vinyl adhesion or incorrect removal technique. The tack level must still be matched to the vinyl surface, liner release force and intended application.
YG Group Transfer Tape Formats
YG Group supplies clear PVC and PET transfer tape in finished-roll and jumbo-roll formats.
Available tack, film, liner, roll, core, winding and packaging options depend on the selected model and processing requirements. Customized core printing may also be discussed where applicable.
Before bulk ordering, test the selected transfer tape with the customer’s actual vinyl and vinyl release liner. This helps confirm both pickup and removal performance under the intended processing conditions.
Confirm the available construction against the current product specification or TDS for the selected model.
Frequently Asked Questions
Why does my vinyl stay on the release liner?
The transfer tape may have insufficient pickup force or incomplete contact with the vinyl. Matte surfaces, high liner release force, cutting problems, contamination and uneven pressure can also cause failed pickup.
Why does the vinyl lift when I remove the transfer tape?
The vinyl may not have bonded firmly to the surface, or the transfer tape may be too aggressive for the application. Repress the graphic and remove the tape slowly at a low angle.
Can higher-tack transfer tape solve pickup problems?
Sometimes, but higher tack may also make final removal more difficult. Check the vinyl surface, liner release force, transfer tape contact and application pressure before increasing tack.
Why does transfer tape wrinkle during lamination?
Wrinkles usually result from uneven tension, poor alignment, film stretching or inconsistent squeegee pressure. Lower the transfer tape gradually and laminate the graphic in controlled sections.
Does thicker transfer film mean higher tack?
No. Film thickness affects handling and dimensional stability, while adhesive tack affects vinyl pickup and removal. A thicker PVC film does not automatically have higher tack than a thinner PET film. Confirm tack separately.
What information is needed to troubleshoot a transfer tape problem?
Provide photos or video, vinyl and liner specifications, the current transfer tape, graphic size and the stage where the failure begins. These details help separate pickup, lamination, positioning and removal problems.
Request Technical Support or a Quotation
For technical troubleshooting, send YG Group:
- Photos or video of the failure
- Vinyl and vinyl release liner specifications
- Current transfer tape material, film thickness, tack level and roll size, where available
- Graphic size
- Stage where the failure begins
- Transfer tape lamination method: manual or machine
- Final vinyl installation method and application surface, where relevant
Examples of application surfaces include glass, metal, painted panels and plastic components.
For a quotation, also provide:
- Required roll width and length
- Core size
- Intended processing method
- Finished-roll or jumbo-roll requirement
- Estimated order quantity
- Packaging or core-printing requirements, where applicable
Where available, include actual vinyl samples or reference material.
YG Group can review the failure information, compare the vinyl and liner requirements, and recommend samples for pickup and removal testing before bulk production.